VkCubeはVulkan-Toolsのgithubでソースコードが公開されており誰でもビルド(コンパイル)して手元で動かせる。Androidでもapkを作成する手順が現在サポートされているため簡単に実行できる。
Androidアプリ(apk)ビルド
ビルドに使うのはWindowsではなくLinuxデスクトップを想定します。確認できているのはUbuntu24.04です。最初に必要なプログラムをインストールします。openjdk-17-jdkはAndroid SDKを使うために必要。build-essentialは必要ない。Dockerに慣れている読者は最後にDockerfile経由で一気に実行する方法にジャンプすることをお勧めします。
sudo apt install -y \
    git \
    cmake \
    ninja-build \
    wget \
    unzip \
    pkgconf \
    openjdk-17-jdk
Android SDKをインストール・設定する。公式サイトから「コマンドラインツールのみ」を選択し、利用規約に同意したらリンクを取得してwgetで指定する。
wget https://dl.google.com/android/repository/commandlinetools-linux-13114758_latest.zip
unzip commandlinetools-linux-13114758_latest.zip && cd cmdline-tools
mkdir -p $HOME/android-sdk/cmdline-tools/latest && \
cp -r * $HOME/android-sdk/cmdline-tools/latest/この例では$HOME/android-sdkにAndroid SDKの実態をインストールしているがどこでもよい。口述するDockerfileにすべて各手順では/usr/local/android-sdkにインストールしている。
export ANDROID_HOME=$HOME/android-sdk
export ANDROID_SDK_ROOT=$HOME/android-sdk
export ANDROID_NDK_HOME=$HOME/android-sdk/ndk/28.1.13356709
export PATH=$PATH:$HOME/android-sdk/cmdline-tools/latest/binで必要な環境変数を指定してSDKライセンスに同意する。すべてyで同意しておく必要がある。
sdkmanager --licensessdkmanager経由で必要なAndroid NDKとビルドツールをインストールする。
sdkmanager "ndk;28.1.13356709"
sdkmanager "platforms;android-26"
sdkmanager "build-tools;36.0.0"
セミコロン以降が別のコマンドの扱いとならないために、このコマンドではダブルクォーテーションは必須です。これでAndroid SDKの準備は完了です。
cd $HOME
git clone --depth 1 -b vulkan-sdk-1.4.313.0 https://github.com/KhronosGroup/Vulkan-Tools.git
cd $HOME/Vulkan-Tools
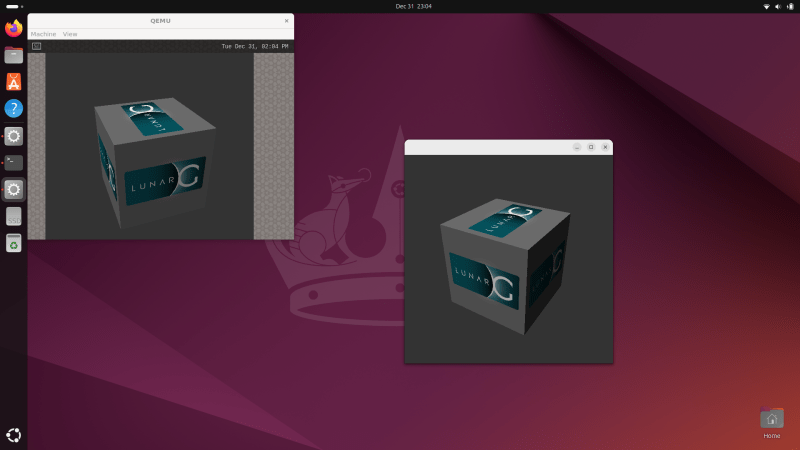
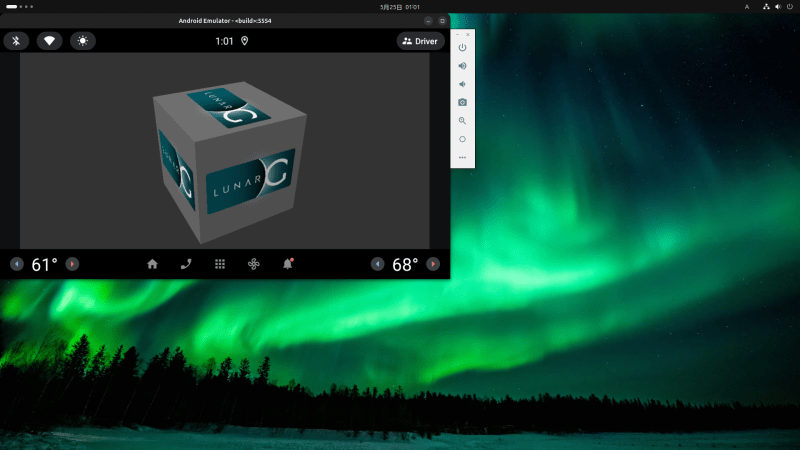
PATH=/usr/local/android-sdk/build-tools/36.0.0/:$PATH ./scripts/android.py --apkビルドが成功すると下記の場所にVkCube.apkファイルが作成されています。普通のAndroidアプリとしてエミュレータまたはAndroidスマホに入れて動作させることができます。apkのサイズは3MBほどです。
ls -lh $HOME/Vulkan-Tools/build-android/bin/VkCube.apk
-rw-r--r-- 1 user user 2.9M May 24 14:39 /tmp/Vulkan-Tools/build-android/bin/VkCube.apk
Androidアプリ (apk) Dockerイメージ
Dockerに慣れている開発者は下記ファイルをコピーし、Dockerイメージからapkファイルを取出すのが簡単です。実際、上記の手順はこの方法でUbuntu24.04をベースとしたときに必要なパッケージの漏れがないことを検証しています。
FROM ubuntu:24.04

RUN apt update && apt install -y tzdata

RUN apt update && apt install -y \
    git \
    cmake \
    ninja-build \
    wget \
    unzip \
    pkgconf

RUN apt install -y openjdk-17-jdk

RUN cd /tmp && \
    wget https://dl.google.com/android/repository/commandlinetools-linux-13114758_latest.zip && \
    unzip commandlinetools-linux-13114758_latest.zip && cd cmdline-tools && \
    mkdir -p /usr/local/android-sdk/cmdline-tools/latest && \
    cp -r * /usr/local/android-sdk/cmdline-tools/latest/

ENV ANDROID_HOME=/usr/local/android-sdk
ENV ANDROID_SDK_ROOT=/usr/local/android-sdk
ENV ANDROID_NDK_HOME=/usr/local/android-sdk/ndk/28.1.13356709
ENV PATH=$PATH:/usr/local/android-sdk/cmdline-tools/latest/bin

RUN yes | sdkmanager --licenses && \
    sdkmanager "ndk;28.1.13356709" "platforms;android-26" "build-tools;36.0.0"

RUN apt install -y ninja-build

RUN git clone...